
Cisco Systems created the Cisco Discovery Protocol (CDP) as a Layer 2 network protocol that is media- and protocol-independent. It is used to discover information about LAN peers that are immediately connected.
All Cisco devices have CDP enabled by default and operate at the OSI Data Link layer. This enables the use of CDP in situations where network layer protocols are not configured, such as the initial activation of a network device.
The primary purpose of CDP is to facilitate network administration, particularly in environments with a large number of nodes. Here are its benefits:
Device Discovery: CDP can identify, among other useful information, the IP address, model, IOS, and capabilities of neighboring Cisco devices. It is advantageous when connecting to a new network device without knowing its specifications.
Network Topology Mapping: At regular intervals, CDP gathers information about other devices that can be used to generate a comprehensive network topology mapping. This is necessary for administrators to understand how devices are connected, and it can be used to identify potential failure points or expansion opportunities.
CDP is advantageous during network troubleshooting for diagnosing network issues. For instance, it can help determine if there is a link or interface problem between devices or if a device is not responding because it is powered off or has a network layer problem.
Keep in mind that CDP can also pose a potential security danger despite being a potent tool. An intruder attempting to map your network may find CDP information useful. Therefore, disabling CDP on interfaces that connect to untrusted networks may be logical.
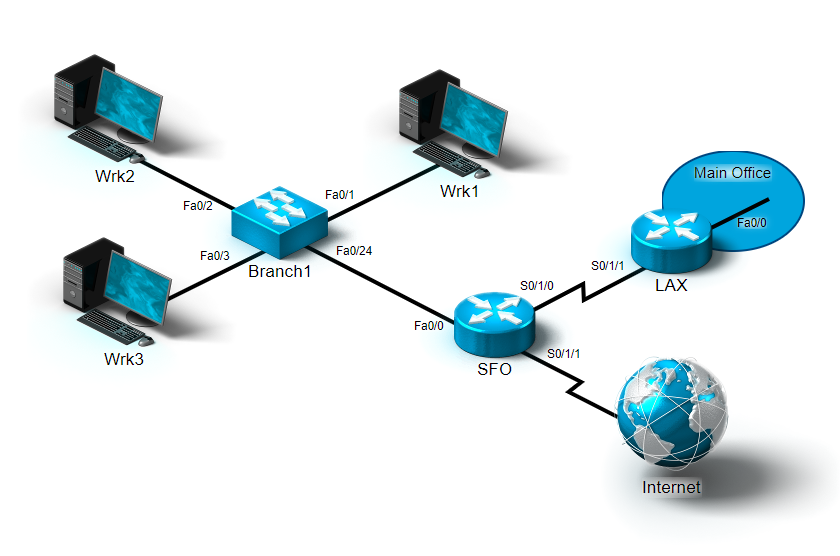
Below are the configuration of Cisco Discovery Protocol (CDP) using the Cisco CLI (Command-Line Interface):
- Configure the Branch 1 switch.
- Select Branch 1.
- Press Enter to get started.
- At the Branch1> prompt, type enable and press Enter.
- At the Branch1# prompt, type configure terminal and press Enter.
- At the Branch1(config)# prompt, type cdp timer 90 and press Enter.
- At the Branch1(config)# prompt, type cdp holdtime 250 and press Enter.
- At the Branch1# prompt, type exit and press Enter.
- At the Branch1# prompt, type copy running-config startup-config and press Enter.
- Press Enter to begin building the configuration.
- Configure the SFO router.
- Select SFO.
- Press Enter to get started.
- At the SFO> prompt, type enable and press Enter.
- At the SFO# prompt, type configure terminal and press Enter.
- At the SFO(config)# prompt, type cdp timer 90 and press Enter.
- At the SFO(config)# prompt, type cdp holdtime 250 and press Enter.
- At the SFO(config)# prompt, type int serial0/1/1 and press Enter.
- At the SFO(config-if)# prompt, type no cdp enable and press Enter.
- At the SFO(config-if)# prompt, type exit and press Enter.
- At the SFO(config)# prompt, type exit and press Enter.
- At the SFO# prompt, type copy running-config startup-config and press Enter.
- Press Enter to begin building the configuration.
Let’s assume we discovered that someone with administrative privileges had modified the SFO router’s CDP. Implementing the show running-config command to observe current settings and then reconfiguring the network device is a best practice. You can see that I skipped this phase, so do not repeat my mistake in a real-life scenario.
You may have noticed that I entered distinct numbers for this lab rather than the same numbers from the previous demonstration. That’s because our objective is to reset both the timer and holdtime to default. A quick tip: You can reset to default by entering “no cdp timer” and “no cdp holdtime” commands rather than the actual numbers.
- Select SFO.
- Press Enter to get started.
- At the SFO> prompt, type enable and press Enter.
- At the SFO# prompt, type configure terminal and press Enter.
- At the SFO(config)# prompt, type cdp run and press Enter.
- Reset the CDP holdtime and timer values to their default values.
- At the SFO(config)# prompt, type cdp timer 60 and press Enter.
- At the SFO(config)# prompt, type cdp holdtime 180 and press Enter.
- Enable CDP for the FastEthernet0/0 interface.
- At the SFO(config)# prompt, type int fa0/0 and press Enter.
- At the SFO(config-if)# prompt, type cdp enable and press Enter.
- Enable CDP for the Serial0/1/0 interface.
- At the SFO(config-if)# prompt, type int s0/1/0 and press Enter.
- At the SFO(config-if)# prompt, type cdp enable and press Enter.
- Disable CDP for the Serial0/1/1 interface.
- At the SFO(config-if)# prompt, type int s0/1/1 and press Enter.
- At the SFO(config-if)# prompt, type no cdp enable and press Enter.
- Press Ctrl + Z.
- At the SFO(config-if)# prompt, type show cdp neighbor and press Enter to check your work.
Notice that int s0/1/1 is no longer a neighbor because you removed it. - Save your changes to the startup-config file
- At the SFO# prompt, type copy running-config startup-config and press Enter.
- Press Enter to begin building the configuration.
We’re now concluding this segment by navigating through CDP information. We’ll review how the “show cdp neighbors” command is used to gather information. I apologize for the late start; I was enjoying some lo-fi music. Remember, you can adjust the pace of this clip to suit your comfort.
Consider the “show cdp neighbors” and “show cdp neighbors detail” commands as city roadmaps. Just like a roadmap shows the layout of streets and important locations, these commands allow you to logically map out which other devices are connected to the device you’re diagnosing. These are essential tools; without them, you’d be navigating through your network like a city without a map!
The key distinction is that “show cdp neighbors” provides concise details, while “show cdp neighbors detail” reveals more thorough information that can be extremely useful in your network diagnostics.
Lastly, I want to mention an important aspect of network discovery protocols. Although CDP is Cisco’s proprietary protocol designed to communicate exclusively with Cisco systems, other options exist. A vendor-neutral protocol known as the Link Layer Discovery Protocol (LLDP) serves a similar purpose to CDP. The significant advantage of LLDP is that it allows the Cisco system to communicate with external vendors that are LLDP-capable, expanding the network’s interconnectivity and providing a broader overview of the network landscape.